Oct 14 2022

Oct 14 2022
Oct 14 2022
Oct 01 2022
The standard process specification of heater element's production line (Part 1)
1. Pipe cutting (cutting)
1. Measure the specifications of the metal tube of the heater element, mainly to detect the difference between the outer diameter of the metal tube of each batch of heater element ≤0.2mm; the difference of the tube wall thickness ≤0.2mm;
2. The incision of the heater element must not have burrs caused by friction between the cutter and the cut surface;
3. The width of the incision of the heater element should not be greater than 2.5mm;
4. The length tolerance of the heater element is ±0.5mm;
5. Mainly self-inspection, first inspection by inspectors and random inspection;
Tooling and measuring tools and equipment: white steel knife, steel ruler, tape measure, caliper, instrument lathe
2. Chamfering (deburring)
1. Chamfer the inner holes at both ends of the heater element to 0.3×45° without burrs;
2. Squeeze the heater element by compressed air to suppress 6-7 kilograms of force, and immerse the heater element in the water tank to observe whether there are bubbles produced.
Work clamp measuring tools and equipment: drill bit, trolley, air compressor, sink, external pressure gauge.
Three, wash the tube
Use a brush to go back and forth twice. When the inner wall of the metal tube used for the electric heating tube is too dirty, brush it back and forth with a steel wire ball, and blow away the residue with compressed air. Observe the inside of the tube in the sun.
Tools and measuring tools and equipment: various specifications of long brushes, stainless steel wire balls.
Four, press-fit solid plug
Press the lead rod into the solid plug, and press the size according to the length of the lead rod in the production order.
Work clamp measuring tools and equipment: steel ruler, hand-carried press
Five, winding
1. According to the production order, select the wire type, wire wrap, and mandrel, pay attention to check the wire diameter;
2. Ensure that the winding distance is even, and there must be no "jumping" phenomenon;
3. Insert the lead rod and ensure the winding resistance value according to the production order. Check that the actual close-winding length is ±10mm between the close-winding length marked in the production order and pass;
4. Mainly self-inspection, and inspectors conduct random inspections.
Tooling and measuring tools and equipment: wire winding machine, wire winding mandrel of various specifications, tape measure, resistance value digital meter.
Six, spot welding (oxygen welding)
1. The lead rod and resistance wire must be in close contact after being penetrated;
2. Ensure that the welding is firm and the resistance wire does not slip off the lead rod when the tube is shrunk;
3. Adjust the spot welding current so that the spot welding does not spark and smoke is the appropriate current. The welding spot should be spot welded at least 2mm from the end surface of the wire threading part of the lead rod, and there are no less than 2 welding spots. Solder, and make the wire head not to be tilted;
4. The wire diameter larger than 0.8mm should be oxygen welded. The welding point should be where the resistance wire penetrates the lead rod, the distance between the first and second loops of the resistance wire tail, and the other parts near the flame should be wrapped with wet asbestos thread to prevent wire Partial annealing, causing uneven drawing;
5. When moving the finished product, handle it with care to ensure that the resistance wire is not deformed;
6. Only after the inspector passes the inspection, can it be transferred to the next process.
Work clamp measuring tools and equipment: energy storage spot welding machine, oxygen welding equipment, welding wire.
7. Powder feeding (key and important process)
1. Clean the wire with high-grade gasoline and blow dry with compressed air;
2. Spread the MgO powder in the pan, the thickness of which does not exceed 40mm, and put it into the oven. When the magnesium core needs to be worn, the magnesium core is also put into the oven and bake at 100°C for 1 to 3 hours to make it completely dry. Try to bring the temperature into the powder;
3. Ensure the length of the lead rod into the tube according to the production order;
4. When the wire diameter is ≥0.5mm, it should be drawn to two-thirds of the tube length, and lightly drawn when the magnesium core is required;
5. The filling ratio is required to reach 2.4~2.6g/㎝2 after adding powder;
6. According to the thinner resistance wire diameter, adjust the vibration as small as possible;
Note: the phenomenon of "silk drooping" occurs,
7. When installing the hollow plug, ensure that the lead rod does not move or rotate, and ensure that the plug is pressed firmly to ensure that the powder does not leak;
8. When selecting the powder liner (double liner), the outer diameter of the liner should be less than the inner diameter of the pipe 0.5mm, and the diameter of the inner liner should not be greater than the outer diameter of the wire 0.5mm;
9. Self-check withstand voltage and insulation, only after passing it, can it be transferred to the next process;
10. Matters needing attention when adding powder (process description):
a. Visually inspect the uniformity of the spiral resistance wire. Extend the resistance wire to one-half of the tube length and observe whether the density is basically uniform;
b. Check the material, length, and diameter of the lead rod, and straighten it if it is bent;
c. If the pipe is bent, straighten it.
d. Formula for calculating powder weight (neglect the weight of wire, lead rod and plug weight):
W = d2·L·V≈0.785 d2·L·V
In the formula: d—tube inner diameter ㎝ L—tube length ㎝ V—powder density 2.4~2.6g/㎝2
Tools and measuring tools and equipment: powder feeding machine, automatic breakdown instrument, oven, tape measure, cleaning the pan, gasoline.
Eight, shrink tube
1. Carefully wipe all parts of the metal pipe of the heater element clean;
2. Pay attention to the direction of the shrinking tube, and ensure that the solid plug enters the roll first (air-fired tubes advocate positive and negative shrinking tubes);
3. The tolerance of pipe diameter after shrinking is ±0.08mm (including the tolerance of roundness);
4. The straightness after shrinking the tube is not more than 4mm per meter;
5. Each time the roll is debugged, no more than 8 debugged parts are provided;
6. The inspectors sample the pipe diameter and straightness, and sample 20% of the resistance value and pipe length.
Note: After the tube is reduced, the difference between the longest and the shortest tube should not exceed 3% of the "tube length after tube reduction" required by the production order; when the tube length disparity after tube reduction is too large and irretrievable, the waste is included in the powder.
Work clamp measuring tools and equipment: tube shrinking machine, tape measure, caliper.
Nine, both ends of the car
1. Make sure that the rod car is symmetrical after pulling out, and the difference between the exposed lengths at both ends is not more than 2mm;
2. The length tolerance of the pipe is ±0.5mm;
3. Use a file to pour the outer burr;
4. Self-inspection is the main task, and inspectors conduct random inspections.
Work clamp measuring tools and equipment: trolley instrument lathe, white steel knife, tape measure, steel ruler.
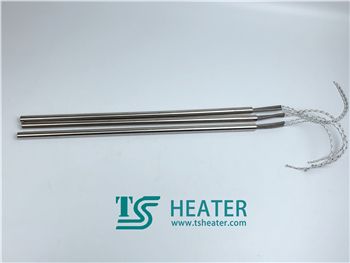
Our company's quality products:Fast Heat Cartridge Heater,Electric Cartridge Heater,Cartridge Heater With Built In Thermocouple,etc.